In this Angular tutorial, you will learn how to create dynamic FormsGroup in the Angular application. You will also get to know how to enable/ disable a section/ form group in a reactive form and dynamically add or remove form groups and controls.
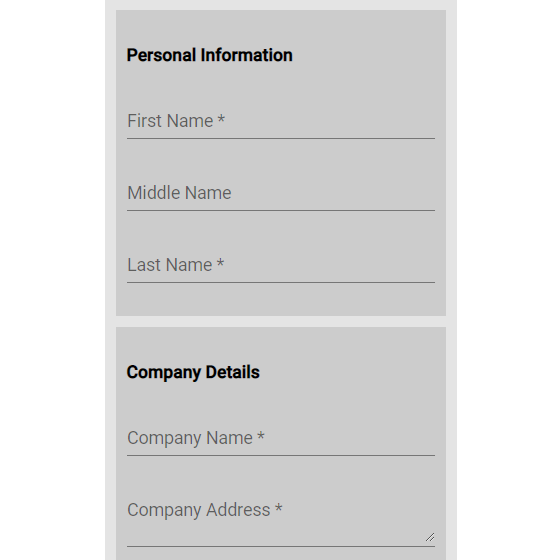
Using Reactive forms in Angular, we can create Forms with multiple sections which are called form groups. These form groups help to easily create multiple sections of controls in the same place. For example, you may have a profile form which can have different sections for personal information and professional details.
By understanding the concept of Forms Group you create complex forms with dynamic nested reactive forms in angular with much ease.
Moreover, you can perform various operations on these form groups like enable or disable a single section, add or remove a control, reset or validate a specific section on the form.
In this guide, we will walk through detailed steps on creating the reactive forms with a dynamic JSON object. That will create a Form having action to perform various actions which we discussed.
Let’s start the implementation…
How to dynamically create FormsGroup in Angular App?
Follow these steps to dynamically create Forms Group and Form Control using JSON object in Angular using Reactive Forms:
Step 1) Create Angular App
Step 2) Import Form Modules
Step 3) Add Material Library (Optional)
Step 4) Dynamic HTML Forms Template
Step 5) Generate FormsGroup with Dynamic JSON
Step 6) See In Action
Step 1) Create Angular App
First, create a new Angular project by executing the below command or continue with your existing project.
ng new angular-dynamic-reactive-forms-appAfter the application is created, enter into the app directory:
cd angular-dynamic-reactive-forms-appAfterwards, you can open the Angular app in your favourite IDE like Visual Studio Code.
Step 2) Import Form Modules
To use forms in the Angular application, it is must to import the Forms module into the AppModule. For template-driven forms we need to import the FormsModule, but if you are going to use the Reactive Forms approach then ReactiveFormsModule needs to be imported as well.
Open the app.module.ts file to add the FormsModule and ReactiveFormsModule in the imports array as shown below:
import { NgModule } from '@angular/core';
import { FormsModule, ReactiveFormsModule } from '@angular/forms';
import { BrowserModule } from '@angular/platform-browser';

import { AppComponent } from './app.component';

@NgModule({
  declarations: [AppComponent],
  imports: [
    BrowserModule,
    FormsModule,
    ReactiveFormsModule
  ],
  providers: [],
  bootstrap: [AppComponent],
})
export class AppModule {}
Step 3) Add Material Library (Optional)
In our demo application, we will install and use the Material library components. But it is optional and project-specific, all other steps will remain the same and work as expected even without the Material library.
To add a Material library to your project, execute the following command and answer a few questions ask based on the configuration required in your Angular project. You can simply hit enter for each step to select default ones.
ng add @angular/materialAlso, import the Material Modules that we are going to use in our application. Open the app.module.ts file and update the imports array with the following:
<strong>MatFormFieldModule</strong>: Creates form field component<strong>MatInputModule</strong>: Creates mat Input control<strong>MatCheckboxModule</strong>: Creates Checkbox UI control
import { NgModule } from '@angular/core';
import { FormsModule, ReactiveFormsModule } from '@angular/forms';
import { BrowserModule } from '@angular/platform-browser';

import { AppComponent } from './app.component';
import { BrowserAnimationsModule } from '@angular/platform-browser/animations';

// Material Modules
import { MatFormFieldModule } from '@angular/material/form-field';
import { MatInputModule } from '@angular/material/input';
import { MatCheckboxModule } from '@angular/material/checkbox';

@NgModule({
  declarations: [AppComponent],
  imports: [
    BrowserModule,
    FormsModule,
    ReactiveFormsModule,
    BrowserAnimationsModule,
    MatFormFieldModule,
    MatInputModule,
    MatCheckboxModule,
  ],
  providers: [],
  bootstrap: [AppComponent],
})
export class AppModule {}
Step 4) Dynamic HTML Forms Template
Now, we will create a dynamic form, that will create the FormsGroup and its controls dynamically using the JSON object. The JSON object FORM_DATA will have forms group and its various controls.
FORM_DATA = [
    {
      formGrpLabel: 'Personal Information',
      formGrpName: 'controlGroup1',
      formControls: [
        {
          label: 'First Name',
          name: 'first_name',
          value: '',
          required: true,
          type: 'text',
        },

		...
      ],
    },

	...
  ];
We also have a switch template to decide if text, textarea or checkbox needs to be created based on the type inside the control.
Open the app.component.html file and update it with Form and its controls:
<div class="wrapper">
<form [formGroup]="myFormGrp">
<div class="formGroupWrap" [formGroupName]="fg.formGrpName" *ngFor="let fg of FORM_DATA">
<h4>{{fg.formGrpLabel}}</h4>
<div *ngFor="let fc of fg.formControls">
<ng-container [ngSwitch]="fc.type">
<ng-container *ngSwitchCase="'text'">
<mat-form-field>
<mat-label>{{fc.label}}</mat-label>
<input matInput [formControlName]="fc.name" [name]="fc.name" />
</mat-form-field>
</ng-container>
<ng-container *ngSwitchCase="'textarea'">
<mat-form-field>
<mat-label>{{fc.label}}</mat-label>
<textarea matInput [formControlName]="fc.name" [name]="fc.name"></textarea>
</mat-form-field>
</ng-container>
<ng-container *ngSwitchCase="'checkbox'">
<mat-checkbox [formControlName]="fc.name">{{fc.label}}</mat-checkbox>
</ng-container>
</ng-container>
</div>
</div>
</form>
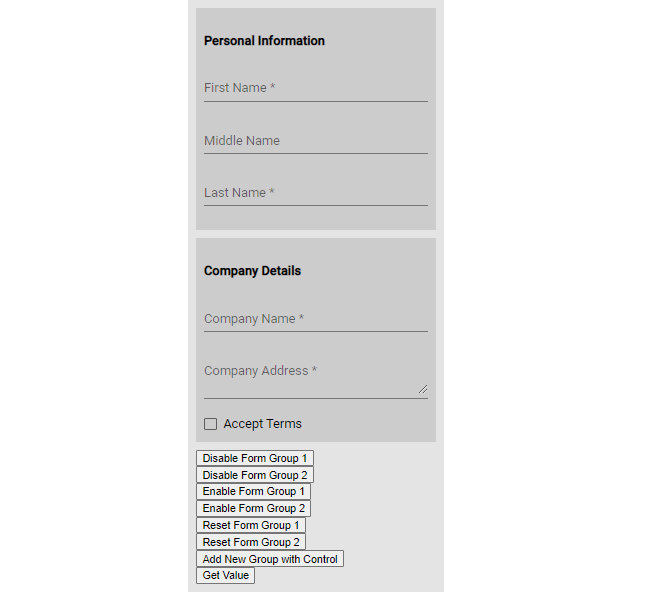
<div><button (click)="enableDisableFormGroup ('disable1')">Disable Form Group 1</button></div>
<div><button (click)="enableDisableFormGroup('disable2')">Disable Form Group 2</button></div>
<div><button (click)="enableDisableFormGroup('enable1')">Enable Form Group 1</button></div>
<div><button (click)="enableDisableFormGroup('enable2')">Enable Form Group 2</button></div>
<div><button (click)="enableDisableFormGroup('reset1')">Reset Form Group 1</button></div>
<div><button (click)="enableDisableFormGroup ('reset2')">Reset Form Group 2</button></div>
<div><button (click)="addControl()">Add New Group with Control</button></div>
<div><button (click)="getValues()">Get Value</button></div>
</div>After the form, we have some action buttons to demonstrate various operations on form groups like enable, disable, reset, add form group and its control and get the value of the complete form.
Step 5) Generate FormsGroup with Dynamic JSON
Thereafter, we will update the component class to use FormGroup and FormControlclasses to create a dynamic reactive form on the template.
We will have FORM_DATA to represent the form group and its controls, from which we will create the reactive form. The generateFrom() will create the form group by traversing the data using forEach function.
The addControl() function will create a new From group to append dynamically in the existing created form on UI and its form object.
The getValue() function will manage to fetch all the form groups and their control values in a JSON object and display its value in the console. This function can be used as a good start to extend your own logic as required.
Open the app.component.ts file and update with the following:
import { Component } from '@angular/core';
import { FormControl, FormGroup, Validators } from '@angular/forms';
@Component({
  selector: 'app-root',
  templateUrl: './app.component.html',
  styleUrls: ['./app.component.css'],
})
export class AppComponent {
  title = 'App';
  public myFormGrp!: FormGroup;

  constructor() {}

  FORM_DATA = [
    {
      formGrpLabel: 'Personal Information',
      formGrpName: 'controlGroup1',
      formControls: [
        {
          label: 'First Name',
          name: 'first_name',
          value: '',
          required: true,
          type: 'text',
        },
        {
          label: 'Middle Name',
          name: 'mid_name',
          value: '',
          required: false,
          type: 'text',
        },
        {
          label: 'Last Name',
          name: 'last_name',
          value: '',
          required: true,
          type: 'text',
        },
      ],
    },
    {
      formGrpLabel: 'Company Details',
      formGrpName: 'controlGroup2',
      formControls: [
        {
          label: 'Company Name',
          name: 'comp_name',
          value: '',
          required: true,
          type: 'text',
        },
        {
          label: 'Company Address',
          name: 'comp_address',
          value: '',
          required: true,
          type: 'textarea',
        },
        {
          label: 'Accept Terms',
          name: 'accept_terms',
          value: '',
          required: true,
          type: 'checkbox',
        },
      ],
    },
  ];

  ngOnInit(): void {
    this.generateForm();
  }

  // Create reactive form
  generateForm() {
    const group: FormGroup = new FormGroup({});
    this.FORM_DATA.forEach((fg) => {
      const formGroup: FormGroup = new FormGroup({});
      fg.formControls.forEach((fc) => {
        const nCtrol = {
          name: fc.name,
          control: fc.required
            ? new FormControl(fc.value || '', Validators.required)
            : new FormControl(fc.value || ''),
        };

        formGroup.addControl(fc.name, nCtrol.control);
      });

      group.addControl(fg.formGrpName, formGroup);
    });
    this.myFormGrp = group;
  }

  // Get from data
  getValues() {
    let completeValue: { [x: string]: any } = {};

    this.FORM_DATA.forEach((fg) => {
      completeValue[fg.formGrpName] =
        this.myFormGrp.controls[fg.formGrpName].value;
    });
    console.log(completeValue);
  }

  // Action handler method
  enableDisableFormGroup(opration: string) {
    switch (opration) {
      case 'disable1':
        this.myFormGrp.get('controlGroup1')!.disable();
        break;

      case 'disable2':
        this.myFormGrp.get('controlGroup2')!.disable();
        break;

      case 'enable1':
        this.myFormGrp.get('controlGroup1')!.enable();

        break;

      case 'enable2':
        this.myFormGrp.get('controlGroup2')!.enable();
        break;

      case 'reset1':
        this.myFormGrp.get('controlGroup1')!.reset();

        break;

      case 'reset2':
        this.myFormGrp.get('controlGroup2')!.reset();

        break;

      default:
        break;
    }
  }

  // Add froms group and its control
  addControl() {
    let t = new Date().getTime();
    const formGroup: FormGroup = new FormGroup({});
    const nCtrol = {
      name: 'newControl' + t,
      control: new FormControl('', Validators.required),
    };
    formGroup.addControl('newControl' + t, nCtrol.control);
    this.myFormGrp.addControl('newFromGroup' + t, formGroup);

    this.FORM_DATA.push({
      formGrpLabel: 'New From Group' + t,
      formGrpName: 'newFromGroup' + t,
      formControls: [
        {
          label: 'New Control' + t,
          name: 'newControl' + t,
          value: '',
          required: true,
          type: 'text',
        },
      ],
    });
  }
}
Step 6) See In Action
We are done with the implementation and now you can run the application by hitting npm start command. It will open the application on the default 4200 port at the following URL:
Find working app on StackBlitz
Conclusion
We have created the application to demonstrate the dynamic implementation of reaction Forms in the Angular application. The HTML template with formsGroup is dynamic and flexible to kickstart your project. You can add any number of form controls in the template to support various form control types like Select, Radio button, Toggle, File selector etc.
Hope it helped, thanks…