Stripe is a platform that allows us to handle online payments which doing from scratch is an extremely lengthy process. It also adds automation for logistics and handling payments and support for multiple modes and in any currency.
Adding Stripe in a React project is very easy and needs almost no coding for a checkout button. It simply adds a button and takes amount needed to pay, then takes in user payment details and done!
For using Stripe you need to create an account which is free to use for development and integration in test mode. After that, you can buy a secret key later which is used for handling real transactions.
Create Stripe Account
Step 1) Create or Sign in to an existing account at Stripe.com

Step 2) After successful login you will be redirected to the dashboard. There you need to scroll down and click on Developers link in the left sidebar.
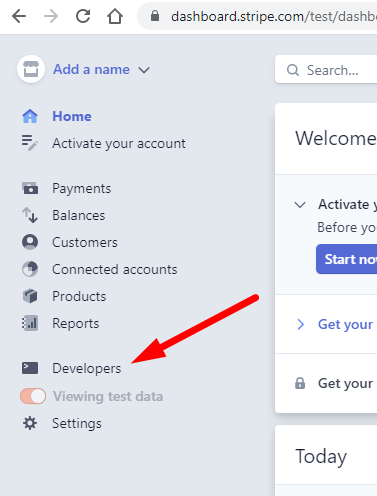
Step 3) Under Developers tab click on API Keys to find Publishable key which will be used in React application to connect it to Stripe dashboard.

Let’s start with integration after creating a new React web app using the create-react-app package.
Create React App
You can easily create a new React web app or go with your current project.
Install
First, you need to install by running following npm command:
$ npm install create-react-appCreate
Execute the following npx command with app name:
$ npx create-react-app stripe-checkout-demoInstall Stripe using react-stripe-checkout
The react-stripe-checkout package provides quickest and simplest integration of payment gateway with many types of methods.
Execute following NPM command at project root to install:
$ npm install react-stripe-checkoutConfiguring a Stripe Payment Button
This package enables the payment using a button on which a user can click to fill out a card or other details to pay on the go.
Create a new folder stripe-button under components as shown below:
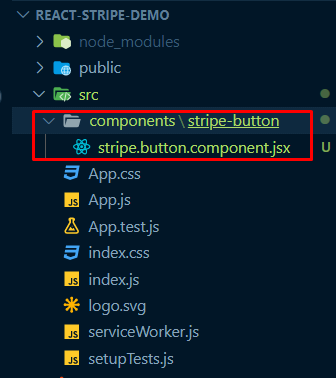
Now in the ~components/stripe-button/stripe.component.jsx file, we will import StripeCheckout class from 'react-stripe-checkout' package then define a functional component with name StripeCheckoutButton.
The StripeCheckoutButton function will have two const variables:
The priceForStripe will have the actual price we are going to charge in cents, yes we need to convert the actual amount into cents before passing it to Stripe checkout component.
So if the total price is $58 then we will pass 58*100 = 5800 cents
The publishableKey will keep the key get got from the Stripe dashboard account in previous steps.
// stripe.button.component.jsx
import React from 'react';
import StripeCheckout from 'react-stripe-checkout';

const StripeCheckoutButton = ({ price }) => {
    const priceForStripe = price * 100;
    const publishableKey = 'pk_test_sLUqHXtqXOkwSdPosC8ZikQ800snMatYMb';

    return (
        ...
    )
}

export default StripeCheckoutButton;
Next, the return block will have StripeCheckout component with configuration properties which you can find here as well.
Here let’s add some generic properties as shown below:
// stripe.button.component.jsx
import React from 'react';
import StripeCheckout from 'react-stripe-checkout';

const StripeCheckoutButton = ({ price }) => {
    const priceForStripe = price * 100;
    const publishableKey = 'pk_test_sLUqHXtqXOkwSdPosC8ZikQ800snMatYMb';

    const onToken = token => {
        console.log(token);
        alert('Payment Succesful!');
    };

    return (
        <StripeCheckout
            label='Pay Now'
            name='Freaky Jolly Co.'
            billingAddress
            shippingAddress
            image='https://www.freakyjolly.com/wp-content/uploads/2020/04/fj-logo.png'
            description={`Your total is $${price}`}
            amount={priceForStripe}
            panelLabel='Pay Now'
            token={onToken}
            stripeKey={publishableKey}
        />
    )
}

export default StripeCheckoutButton;
After successful payment, the method defined in the token property is called back where you can show a message or transaction ID.
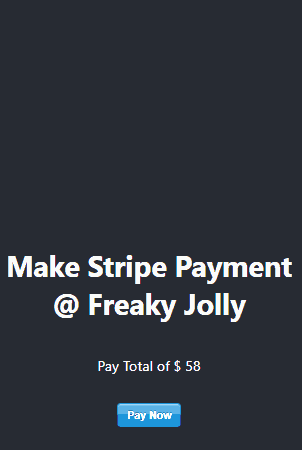
Adding Payment Button
In the App.js file, import the StripeCheckoutButtom the functional component then add it as shown below with price property with the amount to pay:
// App.js
import React from 'react';
import './App.css';

import StripeCheckoutButton from './components/stripe-button/stripe.button.component';

function App() {

  const totalPrice = 58;

  return (
    <div className="App">
      <header className="App-header">
        <h1>Make Stripe Payment @ Freaky Jolly</h1>
        <p>
          Pay Total of $ {totalPrice}
        </p>
        <p>
          <StripeCheckoutButton price={totalPrice} />
        </p>
      </header>
    </div>
  );
}

export default App;
That’s now run your react application $ npm start to see the Pay Button working!
Test Payment Details:
To test payment functionality Stripe provides dummy card details which you can fill to test:
4242 4242 4242 4242 – Exp: 01/28 – CVV: 123
Conclusion: Stripe payment integration can be customized to any level with custom forms and fields. The justifications for why devoting time and endeavors to directing exploration on best counterfeit id states will ultimately pay off.The fundamental rules on deciding the best state to get a phony ID from. For example, assuming you have a decision, don’t go with the ones that require visualizations or UV features. They have good documentation explaining step by step procedures.
Here we learn how to integrate Stripe payment gateways in simplest form using the react-stripe-checkout package.