In this Ionic 5/4 Tutorial, we’ll learn how to add the Sidebar navigation menu in an Ionic Angular application.
A sidebar navigation menu is inspired by native Android and iOS applications. Ionic based hybrid application can also add a similar type of Sidebar navigation drawer easily with the help of UI components provided by Ionic Framework.
Adding a sidebar drawer menu is a widely used method to provide a neat user experience for application navigation between various of its pages.
We’ll discuss important aspects related to the sidebar navigation menu. The following are the main segment we are going to learn with a practical working application.
Let’s quickly get started with Ionic Side Menu Tutorial!
Install & setup Ionic Angular project
Make sure you have the latest version of @ionic/cli installed
$ npm install -g @ionic/cliWe are building with the current version 6.7.0 creating Ionic 5 application using Angular version 9.1.6
We’ll create a new Ionic Angular application with a blank template to understand the Sidebar menu navigation implementation from scratch.
$ ionic start ionic-sidebar-menu-app blank --type=angularNow move to the application folder
$ cd ionic-sidebar-menu-appRun Ionic application using -l flag, for that you need to first install the @ionic/lab module
$ npm install @ionic/lab --save-devThen serve the Ionic app by hitting below command
$ ionic serve --lab
Now we’ll create pages that can be switched by tapping on menu list items. These pages will be navigated by using the Angular Routing module.
To create these new pages we’ll execute ionic generate commands in the ionic CLI terminal.
Create the dashboard, timeline and settings pages to navigate from the sidebar menu under pages folder
$ ionic generate page pages/dashboard
$ ionic generate page pages/timeline
$ ionic generate page pages/settings
Modify existing routing to point new pages
After creating the dashboard, timeline, and settings pages, we need to modify the routes object with updated paths.
Open the app-routing.module.ts file and make the following changes
// app-routing.module.ts
import { NgModule } from '@angular/core';
import { PreloadAllModules, RouterModule, Routes } from '@angular/router';

const routes: Routes = [
  {
    path: '',
    loadChildren: () => import('./pages/dashboard/dashboard.module').then(m => m.DashboardPageModule)
  },
  {
    path: 'timeline',
    loadChildren: () => import('./pages/timeline/timeline.module').then(m => m.TimelinePageModule)
  },
  {
    path: 'settings',
    loadChildren: () => import('./pages/settings/settings.module').then(m => m.SettingsPageModule)
  },
  {
    path: '',
    redirectTo: 'dashboard',
    pathMatch: 'full'
  },
];

@NgModule({
  imports: [
    RouterModule.forRoot(routes, { preloadingStrategy: PreloadAllModules })
  ],
  exports: [RouterModule]
})
export class AppRoutingModule { }
You can safely delete the Home component which is created by default in a blank template based application as we don’t need for this tutorial.
Adding Side Menu Template in Ionic Angular Application
This is a crucial part of this tutorial, where we’ll add a Sidebar menu navigation drawer in your application. We’ll place the Side navigation menu component inside the App component as this is the main wrapper and open all other pages inside the ion-router-outler component.
Now open the app.component.html file and update as shown below:
<ion-app>
  <ion-split-pane contentId="main-content">

    <ion-menu contentId="main-content" type="overlay">

      <ion-content>

        <ion-list id="inbox-list">
          <ion-list-header>cccInbox</ion-list-header>
          <ion-note>[email protected]</ion-note>

          <ion-menu-toggle auto-hide="false" *ngFor="let p of appPages; let i = index">
            <ion-item (click)="selectedIndex = i" routerDirection="root" [routerLink]="[p.url]" lines="none"
              detail="false" [class.selected]="selectedIndex == i">
              <ion-icon slot="start" [ios]="p.icon + '-outline'" [md]="p.icon + '-sharp'"></ion-icon>
              <ion-label>{{ p.title }}</ion-label>
            </ion-item>
          </ion-menu-toggle>
        </ion-list>

        <ion-list id="labels-list">
          <ion-list-header>Labels</ion-list-header>

          <ion-item *ngFor="let label of labels" lines="none">
            <ion-icon slot="start" ios="bookmark-outline" md="bookmark-sharp"></ion-icon>
            <ion-label>{{ label }}</ion-label>
          </ion-item>
        </ion-list>

      </ion-content>

    </ion-menu>

    <ion-router-outlet id="main-content"></ion-router-outlet>

  </ion-split-pane>
</ion-app>
The appPages object is having three properties title, url and icon to create the navigation list using *ngFor directive.
The ion-menu-toggle component is used to toggle a sidebar menu open or closed. All navigation links are created using the ion-item component and wrapped inside the MenuToggle component, so when a user taps on the link, the menu is closed automatically. The autoHide property can be used to show or hide the Sidebar navigation menu from outside on button click. It takes a boolean value, when set to true, the menu is toggled to show otherwise close it.
There are also lots of new components right? let’s have a look at these important components required for adding the Side menu functionality.
ion-split-pane
A split pane is useful when creating multi-view layouts. It takes care of when to show or hide certain UI components based on device screen size changes. The Sidebar navigation shows up when on a larger screen like a desktop but on a smaller mobile screen it works as navigation with toggle feature.
The Menu component is a navigation drawer that slides in from the side of the current view.
Properties
disabled: When set to true the side menu can be disabled. Useful for the screen like log in or registration where slide navigation is not generally required.
side: The Side menu can be opened from either side of the screen. We can set the side property to "end" or "start"
<strong>type</strong>: This is a cool property using which we can animate how the Side menu will open. It can have three options "overlay", "reveal" & "push". We’ll try them all.
Events
There are events to handle operations during the Slide menu progression.
ionDidClose: Emitted when the menu is closed.
ionDidOpen: Emitted when the menu is open.
ionWillClose: Emitted when the menu is about to be closed.
<strong>ionWillOpen</strong>: Emitted when the menu is about to be opened.
Methods
By using the MenuController class, we can control the behavior of the Slide menu.
open: Opens the menu.
close: Closes the menu.
toggle: Toggles the menu.
isActive: Returns true if the menu is active.
isOpen: Returns true if the menu is open.
setOpen: Opens or closes the button. If the operation can’t be completed successfully, it returns false.
The MenuToggle component can be used to toggle a menu open or closed. We’ll place all navigation links inside the MenuToggle component. When a user taps on the link, the side menu will automatically be closed.
The MenuButton component automatically creates the three-line icon and used to open the side menu on a page. We’ll add this component on each page to open the menu on the side menu icon click.
Update App Component Class
Now we’ll update the App component class with currentPageTitle variable to hold selected link title text and appPages object using which we created links inside the ion-menu-toggle component.
Open the app.component.ts file and update with below code:
// app.component.ts
import { Component } from '@angular/core';

import { Platform } from '@ionic/angular';
import { SplashScreen } from '@ionic-native/splash-screen/ngx';
import { StatusBar } from '@ionic-native/status-bar/ngx';

@Component({
  selector: 'app-root',
  templateUrl: 'app.component.html',
  styleUrls: ['app.component.scss']
})
export class AppComponent {


  currentPageTitle = 'Dashboard';

  appPages = [
    {
      title: 'Dashboard',
      url: '',
      icon: 'easel'
    },
    {
      title: 'Timeline',
      url: '/timeline',
      icon: 'film'
    },
    {
      title: 'Settings',
      url: '/settings',
      icon: 'settings'
    }
  ];

  constructor(
    private platform: Platform,
    private splashScreen: SplashScreen,
    private statusBar: StatusBar
  ) {
    this.initializeApp();
  }

  initializeApp() {
    this.platform.ready().then(() => {
      this.statusBar.styleDefault();
      this.splashScreen.hide();
    });
  }
}
Ionic Side Menu Design
We also added a div with class app-logo to display an application logo inside a circle container.
Update the app.component.scss file with below code:
.app-logo{
    background-image: url(https://www.freakyjolly.com/wp-content/uploads/2020/04/fj-logo-1.png);
    height: 150px;
    width: 150px;
    background-repeat: no-repeat;
    border-radius: 320px;
    background-position: center;
    background-size: contain;
    background-color: #e3f8ff;
    margin: 30px auto;
}
Toggle Button in Pages Header
Finally, we are going to add the ion-menu-button component inside out pages template HTMLs. Open the HTML files of our pages and update the ion-toolbar component as shown below:
From this:
  <ion-toolbar>
    <ion-title>
      Title Text
    </ion-title>
  </ion-toolbar>
To this:
  <ion-toolbar>
    <ion-buttons slot="start">
      <ion-menu-button></ion-menu-button>
    </ion-buttons>
    <ion-title>Title Text</ion-title>
  </ion-toolbar>
This will create a three-line ![]() button to open the navigation side menu.
button to open the navigation side menu.
pages > dashboard > <strong>dashboard.page.html</strong>
<ion-header>
  <ion-toolbar>
    <ion-buttons slot="start">
      <ion-menu-button></ion-menu-button>
    </ion-buttons>
    <ion-title>Dashboard</ion-title>
  </ion-toolbar>
</ion-header>

<ion-content class="ion-padding">
  <h1>I am dashboard page</h1>

</ion-content>
pages > timeline > <strong>timeline.page.html</strong>
<ion-header>
  <ion-toolbar>
    <ion-buttons slot="start">
      <ion-menu-button></ion-menu-button>
    </ion-buttons>
    <ion-title>Settings</ion-title>
  </ion-toolbar>
</ion-header>


<ion-content class="ion-padding">
  <h1>I am settings page</h1>

</ion-content>
pages > settings > <strong>settings.page.html</strong>
<ion-header>
  <ion-toolbar>
    <ion-buttons slot="start">
      <ion-menu-button></ion-menu-button>
    </ion-buttons>
    <ion-title>Timeline</ion-title>
  </ion-toolbar>
</ion-header>


<ion-content class="ion-padding">
  <h1>I am timeline page</h1>

</ion-content>
That’s it we have successfully integrated Slide Side menu navigation in our simple blank Ionic Angular application. Now you can run you application by hitting
$ ionic serve --lab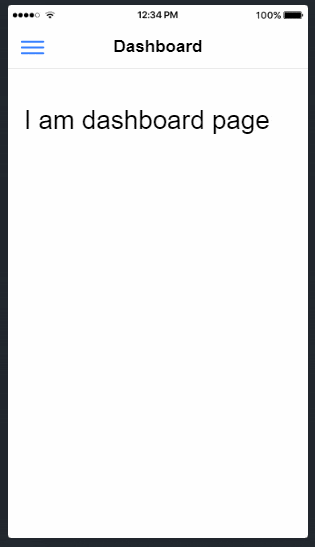
To open in the browser. In a web browser, you may notice some weird scrollbars but in the mobile device, you can hardly differentiate it from a native application.
Yes, I remember I told you we will try different navigation types. Let’s have a look in immediate next step 🙂
There are three types "overlay", "reveal"& "push" which we can define on the <ion-menu> component
<ion-menu type="reveal">
<ion-menu type="push">

Conclusion
Conclusively, we’ have successfully implemented the Slide side menu in our Ionic Angular app and also learned about ionic components we are very useful in quickly implementing the Side menu functionality and provides wide variety of many useful properties and events to control required behavior. In the net tutorial, we will learn how to implement Tab navigation with the Side menu.
If you enjoyed this post please consider sharing it with others
Thanks for reading!
Well done!
Straight to the point, concise and wonderful.