In this article, we will discuss How to validate multiple checkboxes in Ionic 4|5 application using Angular Reactive Forms.
Here we will have a list of the checkbox which can be selected or unselected using a single master checkbox and also individually.
We will add validation on checkbox list using Reactive form approach provided by Angular core API.
Let’s get started with the implementation.
Version Check
@ionic/cli

   _             _
  (_) ___  _ __ (_) ___
  | |/ _ \| '_ \| |/ __|
  | | (_) | | | | | (__
  |_|\___/|_| |_|_|\___| CLI 6.4.1
Update to the latest version of Ionic CLI by running following NPM command:
$ npm install -g @ionic/cli</pre> <h3></h3> <h3>Create an Ionic Application</h3> Using <code>@ionic/cliwe will create a new Ionic application using Angular framework with ablanktemplate:$ ionic new ionic-checkbox-validation blank --type=angular</pre> <h3>Configuration for Angular Forms</h3> To use forms in Angular application, we need to import <code>FormsModuleandReactiveFormsModulein the page module file. As we are going to implement in Home Page so open home.module.ts file import these modules as shown below:// home.module.ts import { NgModule } from '@angular/core'; import { CommonModule } from '@angular/common'; import { IonicModule } from '@ionic/angular'; import { FormsModule, ReactiveFormsModule } from '@angular/forms'; import { RouterModule } from '@angular/router'; import { HomePage } from './home.page'; @NgModule({ imports: [ CommonModule, FormsModule, ReactiveFormsModule, IonicModule, RouterModule.forChild([ { path: '', component: HomePage } ]) ], declarations: [HomePage] }) export class HomePageModule { }Home Page Template
Adding Form
In the Home page template HTML, we will add a form with
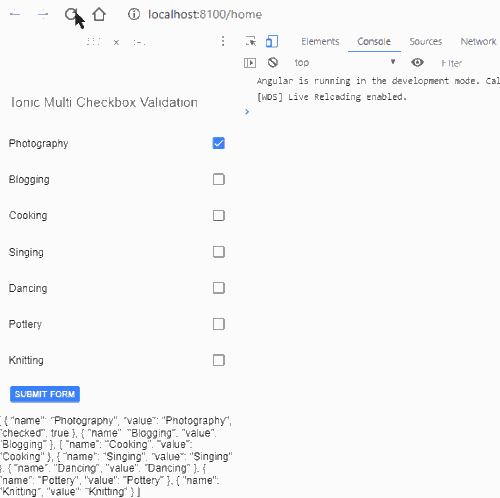
[formBuilder]directive property. The form submit event will be handled by(ngSubmit)method on the form.<form [formGroup]="ionicFormGroup" (ngSubmit)="submitForm()"> ... </form> </pre> <strong>Checkbox list</strong> In the form element, define checkbox elements in <code>ion-listUI component directive. It will iterate overCHECK_LISTdata object using*ngFordirective as shown below:<ion-header [translucent]="true"> <ion-toolbar> <ion-title> Ionic Multi Checkbox Validation </ion-title> </ion-toolbar> </ion-header> <ion-content [fullscreen]="true"> <form [formGroup]="ionicForm" (ngSubmit)="submitForm()"> <ion-list> <ion-item *ngFor="let item of CHECK_LIST; let i=index"> <ion-label>{{item.name}}</ion-label> <ion-checkbox slot="end" [value]="item.value" [checked]="item.checked" (ionChange)="onSelectionChange($event,i)"> </ion-checkbox> </ion-item> <ion-item *ngIf="isFormSubmitted && ionicForm.controls['checkboxArrayList'].errors?.required"> <label class="error-msg"> Please select Hobby! </label> </ion-item> <ion-item class="center"> <ion-button type="submit">Submit Form</ion-button> </ion-item> </ion-list> {{CHECK_LIST | json}} </form> </ion-content></pre> In the above template, we have also added a <code>labelelement to show an error message when no checkbox is selected. This message will only be shown after a user submits the form as we have added a variableisFormSubmittedon*ngIfcondition.Home Component Class
The list of checkboxes will be created dynamically by iterating over the CHECK_LIST object will look like this:CHECK_LIST = [ { name: 'Photography', value: 'Photography', checked: true }, { name: 'Blogging', value: 'Blogging' }, { name: 'Cooking', value: 'Cooking' }, { name: 'Singing', value: 'Singing' }, { name: 'Dancing', value: 'Dancing' }, { name: 'Pottery', value: 'Pottery' }, { name: 'Knitting', value: 'Knitting' } ];</pre> We can set the <code>checkedproperty totrue, if you want to set it checked by default. To instantiate the form as Reactive we will define theionicFormas FormGroup.ionicForm: FormGroup;</pre> In the constructor, we will define checkbox list control as FormArray as shown below: <pre class="wp-block-prismatic-blocks"><code class="language-javascript"> constructor(private formBuilder: FormBuilder) { this.ionicForm = this.formBuilder.group({ checkboxArrayList: this.formBuilder.array([], [Validators.required]) }); }</pre> To update the <code>checkboxArrayListon page load, we will update it in theupdateCheckControl()method which will also be called from checkbox change event in theonSelectionChange()method.updateCheckControl(cal, o) { if (o.checked) { cal.push(new FormControl(o.value)); } else { cal.controls.forEach((item: FormControl, index) => { if (item.value == o.value) { cal.removeAt(index); return; } }); } } onLoadCheckboxStatus() { const checkboxArrayList: FormArray = this.ionicForm.get('checkboxArrayList') as FormArray; this.CHECK_LIST.forEach(o => { this.updateCheckControl(checkboxArrayList, o); }) } onSelectionChange(e, i) { const checkboxArrayList: FormArray = this.ionicForm.get('checkboxArrayList') as FormArray; this.CHECK_LIST[i].checked = e.target.checked; this.updateCheckControl(checkboxArrayList, e.target); }After adding the above methods the final home.page.ts file will look like this:
// home.page.ts import { Component } from '@angular/core'; import { FormBuilder, FormGroup, FormArray, FormControl, Validators } from '@angular/forms'; @Component({ selector: 'app-home', templateUrl: 'home.page.html', styleUrls: ['home.page.scss'], }) export class HomePage { ionicForm: FormGroup; isFormSubmitted = false; CHECK_LIST = [ { name: 'Photography', value: 'Photography', checked: true }, { name: 'Blogging', value: 'Blogging' }, { name: 'Cooking', value: 'Cooking' }, { name: 'Singing', value: 'Singing' }, { name: 'Dancing', value: 'Dancing' }, { name: 'Pottery', value: 'Pottery' }, { name: 'Knitting', value: 'Knitting' } ]; constructor(private formBuilder: FormBuilder) { this.ionicForm = this.formBuilder.group({ checkboxArrayList: this.formBuilder.array([], [Validators.required]) }); this.onLoadCheckboxStatus(); } updateCheckControl(cal, o) { if (o.checked) { cal.push(new FormControl(o.value)); } else { cal.controls.forEach((item: FormControl, index) => { if (item.value == o.value) { cal.removeAt(index); return; } }); } } onLoadCheckboxStatus() { const checkboxArrayList: FormArray = this.ionicForm.get('checkboxArrayList') as FormArray; this.CHECK_LIST.forEach(o => { this.updateCheckControl(checkboxArrayList, o); }) } onSelectionChange(e, i) { const checkboxArrayList: FormArray = this.ionicForm.get('checkboxArrayList') as FormArray; this.CHECK_LIST[i].checked = e.target.checked; this.updateCheckControl(checkboxArrayList, e.target); } submitForm() { this.isFormSubmitted = true; if (!this.ionicForm.valid) { console.log('Please provide all the required values!') return false; } else { console.log('Form Submitted', this.ionicForm.value) } } }
In this tutorial, we implemented Reactive form validation on the checkbox list in Ionic 5 application. We added user Angular form core services to add validation on form. When no value is checked an error message is shown to the user. Thanks for reading!
Category: Ionic Framework