The numbers figures in the Ionic/ Angular application can be converted into an animated sliding counter. The ng2-odometer module adds a pinch of awesomeness to numbers by showing them in an incremental and animated way.
In this post, we will discuss an awesome plugin which can be added to any reactive application including Angular Web App or Angular based Ionic App. After adding this the simple number will look something like this
#Setup Ionic CLI
Ionic application are created using Ionic CLI tool, for that you need to install NodeJs on your system. To most recommended IDE is Visual Studio Code you can download it from here.
After successfully installing NodeJs, open VS Code then open a terminal window by hitting shortcuts Ctr+` or simply go to the top menu then click View > Terminal
Next, install the Ionic CLI package by running below npm command in the terminal
$ npm install -g @ionic/cli</pre> This will install the <code>@ionic/clipackage globally in your system.#Create new Ionic 5 application
Now we will create a new Ionic 5 application with the Angular framework using a blank template to keep the tutorial simple. Run following ionic command to create a new application$ ionic start ionic-counter-app blank --type=angular</pre> After creating the app, move to the app folder <pre class="wp-block-prismatic-blocks"><code class="language-javascript">$ cd ionic0counter-app</pre> then open the app in the VS Code by hitting below shortcut command <pre class="wp-block-prismatic-blocks"><code class="language-javascript">$ code .</pre> <h3>#Install the <code>ng2-odometerpackage After successfully creating the application, we will install theng2-odometerpackage in the application. Run the following command to install the package$ npm install ng2-odometer --save</pre> <h3>#Import Odometer Module in Home Page</h3> Now we'll add an Odometer counter in the Home page. As in the latest version of Angular application, every page has it's own module so we need to import the <code>Ng2OdometerModuleclass in the module of the page itself. Here in theblanktemplate Ionic application, we have a Home page. So open the home.module.ts file them import theNg2OdometerModulethen add in the imports array as shown below:// home.module.ts import { NgModule } from '@angular/core'; import { CommonModule } from '@angular/common'; import { IonicModule } from '@ionic/angular'; import { FormsModule } from '@angular/forms'; import { RouterModule } from '@angular/router'; import { Ng2OdometerModule } from 'ng2-odometer'; import { HomePage } from './home.page'; @NgModule({ imports: [ CommonModule, FormsModule, IonicModule, RouterModule.forChild([ { path: '', component: HomePage } ]), Ng2OdometerModule.forRoot() ], declarations: [HomePage] }) export class HomePageModule { }Now we are open to using the
<ng2-odometer>directive in the page HTML template to create a new odometer counter.
#Adding the Odometer
Now open the home.page.html file, and add the
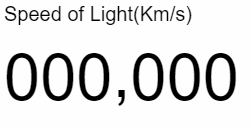
<ng2-odometer>template with[number]property as shown below<h4>Speed of Light(Km/s)</h4>property
<ng2-odometer [number]="speed_of_light"></ng2-odometer></pre>
In the class file, <strong>home.page.ts</strong> just add the variable value
<pre class="wp-block-prismatic-blocks"><code class="language-javascript">export class HomePage {speed_of_light = 299792
}</pre>
<a href="https://www.freakyjolly.com/wp-content/uploads/2020/04/ng2-ododmeter-demo2.gif"><img class="aligncenter size-full wp-image-3910" src="https://www.freakyjolly.com/wp-content/uploads/2020/04/ng2-ododmeter-demo2.gif" alt="" width="250" height="129" /></a>Let's have a look at configurations available
<h3>#Configuration Options</h3>
Following are options available to configure ng2-odometerWe can define<code> [config]
<ng2-odometer [number]="random_number" [config]="{theme:'default'}"></ng2-odometer>', 'or
<ng2-odometer [number]="random_number" [config]="config"></ng2-odometer>
export class HomePage {
public config = {
animation: 'count',
format: 'd',
theme: 'car',
value: 50,
auto: true,
}
}</pre>
</div>
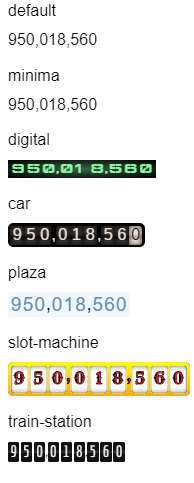
<h3>#Themes</h3>
Options: '<code>defaultminima', 'digital', 'car', 'plaza', 'slot-machine', 'train-station'
animation: Animation effect type. 'slide'(default), 'count'
format: Default is '(,ddd)' Example:
(,ddd) - 12,345,678
(,ddd).dd - 12,345,678.09
(.ddd),dd - 12.345.678,09
value: The initial value of the odometer
auto: Setup auto or manual mode for the odometerThat's it now you can run your app by hitting
$ ionic serve --openSo here we discussed how we can animate number with a sliding effect using the
ng2-odometerplugin library.
Category: Angular
Leave a Reply