In this Ionic 5/4 tutorial, we will implement Google Maps in Ionic Angular App using Cordova and Ionic Native plugins.
As we have already discussed How to Add Google Maps using JavaScript API in Ionic Applications, in this post we will implement Google Maps Cordova plugin using SDK. In comparison to JavaScript API Native SDK, Google Maps are more fast and efficient in terms of performance in mobile applications. Ionic Native Google Maps have more features than we can implement in a fully-featured mobile application with Google Maps like in Native Android or IOS applications. We can easily implement following in Google Maps using this Native Cordova plugin.
– Shapes like circle
– Geocoding
– Custom Draggable Marker and Clusters
– Custom elements like polygon and polylines
– Street Views
and much more…
Here we will create an Ionic 4 Application and Implement Ionic Native Google Maps Plugin. As Ionic version 4 is still in beta phase so we will add a beta version of the Google Maps plugin.
Let’s get started!
Create a new application using Ionic CLI
To create an application you must have NodeJS and Ionic Cordova CLI
$ npm install -g ionic cordovaRun the following command to create a new application
$ ionic start Ionic4GoogleMapsSDK blank --type=angular
$ cd Ionic4GoogleMapsSDK
for Ionic 3 just remove –type=angular
Install Ionic Native Google Maps Cordova and Ionic Native Plugin
Run following commands in the application root to install Cordova in Ionic native plugin. We also need Google API Key to integrate Google Maps API in the application.
Visit here to know more about How to Get Google API Key?
$ npm install @ionic-native/core@beta @ionic-native/google-maps@beta
$ ionic cordova plugin add cordova-plugin-googlemaps --variable API_KEY_FOR_ANDROID="YOUR_API_KEY_HERE" --variable API_KEY_FOR_IOS="YOUR_API_KEY_HERE"
for Ionic 3 run following
$ npm install @ionic-native/core @ionic-native/google-maps
$ ionic cordova plugin add cordova-plugin-googlemaps --variable API_KEY_FOR_ANDROID="YOUR_API_KEY_HERE" --variable API_KEY_FOR_IOS="YOUR_API_KEY_HERE"
Set Environment Variables in the Application Component
In the app.component.ts file, replace following code with environment variables set with Google API Key.
import { Component } from '@angular/core';

import { Platform } from '@ionic/angular';
import { SplashScreen } from '@ionic-native/splash-screen/ngx';
import { StatusBar } from '@ionic-native/status-bar/ngx';
import { Environment } from '@ionic-native/google-maps';

@Component({
  selector: 'app-root',
  templateUrl: 'app.component.html'
})
export class AppComponent {
  constructor(
    private platform: Platform,
    private splashScreen: SplashScreen,
    private statusBar: StatusBar
  ) {
    this.initializeApp();
  }

  initializeApp() {
    this.platform.ready().then(() => {

      Environment.setEnv({
        // api key for server
        'API_KEY_FOR_BROWSER_RELEASE': 'YOUR_API_KEY_HERE',

        // api key for local development
        'API_KEY_FOR_BROWSER_DEBUG': 'YOUR_API_KEY_HERE'
      });

      this.statusBar.styleDefault();
      this.splashScreen.hide();
    });
  }
}
Load map and initialize in canvas on the homepage
In home.page.ts component file call method to load and draw the map in div “map_canvas”
import { Component, OnInit } from '@angular/core';
import {
  ToastController,
  Platform
} from '@ionic/angular';
import {
  GoogleMaps,
  GoogleMap,
  GoogleMapsEvent,
  Marker,
  GoogleMapsAnimation,
  MyLocation
} from '@ionic-native/google-maps';


@Component({
  selector: 'app-home',
  templateUrl: 'home.page.html',
  styleUrls: ['home.page.scss'],
})
export class HomePage implements OnInit {

  map: GoogleMap;
  address:string;

  constructor(
    public toastCtrl: ToastController,
    private platform: Platform
    ) { }

  ngOnInit() {
    // Since ngOnInit() is executed before `deviceready` event,
    // you have to wait the event.
    this.platform.ready();
    this.loadMap();
  }

  loadMap() {
    this.map = GoogleMaps.create('map_canvas', {
      // camera: {
      //   target: {
      //     lat: 43.0741704,
      //     lng: -89.3809802
      //   },
      //   zoom: 18,
      //   tilt: 30
      // }
    });
    this.goToMyLocation();
  }


  goToMyLocation(){
    this.map.clear();

    // Get the location of you
    this.map.getMyLocation().then((location: MyLocation) => {
      console.log(JSON.stringify(location, null ,2));

      // Move the map camera to the location with animation
      this.map.animateCamera({
        target: location.latLng,
        zoom: 17,
        duration: 5000
      });

      //add a marker
      let marker: Marker = this.map.addMarkerSync({
        title: '@ionic-native/google-maps plugin!',
        snippet: 'This plugin is awesome!',
        position: location.latLng,
        animation: GoogleMapsAnimation.BOUNCE
      });

      //show the infoWindow
      marker.showInfoWindow();

      //If clicked it, display the alert
      marker.on(GoogleMapsEvent.MARKER_CLICK).subscribe(() => {
        this.showToast('clicked!');
      });

      this.map.on(GoogleMapsEvent.MAP_READY).subscribe(
        (data) => {
            console.log("Click MAP",data);
        }
      );
    })
    .catch(err => {
      //this.loading.dismiss();
      this.showToast(err.error_message);
    });
  }

  async showToast(message: string) {
    let toast = await this.toastCtrl.create({
      message: message,
      duration: 2000,
      position: 'middle'
    });
    toast.present();
  }
}
In home.page.html add following HTML div to load maps.
<ion-header>
  <ion-toolbar>
    <ion-title>
      Ionic Google SDK Maps
    </ion-title>
  </ion-toolbar>
</ion-header>

<ion-content padding>
    <div id="map_canvas"></div>
</ion-content>
Add the following style to give height and width to Map container in home.page.scss file.
  #map_canvas {
    width: 100%;
    height: 80vh;
  }
Now its done from the code point of view we will now successfully load a simple map in div we defined.
Now you can check your map by running following command
$ ionic cordova run browser
instead of $ ionic serve –open otherwise it will give the following error
[GoogleMaps]
You need to execute "$> ionic cordova run browser".
"$> ionic serve" is not supported.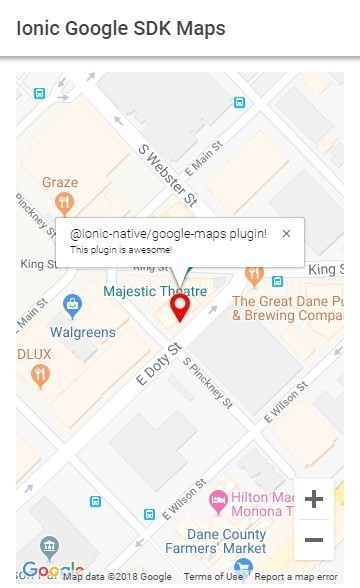
You can check the demo project and other samples here for Ionic’s version 4 and here for Ionic 3 Demo code
Is it possible to download an area or region and save it as local using google map cordova plugin for offline using ?
i follow your tutorial and (download your project from github) run on local machine
in browser it work but on android device map are not work nothing display.
we are getting problem on map to show on android device and browser
[error]
> cordova.cmd run browser
Cannot find module ‘cordova-serve’
Hi,
Its a huge help for me. i been searching for ionic maps native. Do you happen to know how to add multiple marker on maps?
Thanks
I do everything here andit’s working fine in browser, but when I try it on android device I only get a blank white page with the header only showing. I’ve tried putting a separate API key for the android SDK thats restricted to Android Maps SDK but it’s still not working. When I remove the code for getting the coordinates of the user the map works though and it shows the map with hard coded coordinates. Any idea for possible solutions?
thank you! very useful example for the latest version, appreciate the post! ☀️
WC! Glad it helped 😀
How can I run this project in android device?
You can run the following command after connecting your device with PC through USB
$ ionic cordova run android –device
It shows the same error as if you try to open it with [ionc serve].