Google Analytic is very popular among Web applications to track various parameters like traffic analysis based on demography, event activity, content-based analysis etc. We have already discussed How to integrate Google Analytics in Ionic 3 application. Google Analytic provides use dashboards to view real-time traffic on Web Applications.
In this post, we will discuss on How we can integrate Google Analytics in Hybrid applications based on Ionic’s latest version 4. As hybrid application based on web view so it is very easy to integrate with a few steps.
Here we will start with a new Ionic 4 application with latest CLI version. In the application we will discuss how to create a Google Analytics ID spacially for Mobile devices as normal ID for web application does not work normally. We will apply events to track user interaction and also track pages changes by users real-time. To demonstrate fully we will create a multipage Ionic 4 application with sidebar template.
Also See: Add Google Analytics in Ionic 3 Application using Cordova and Ionic Native Plugin
Let’s start!
First, we will create a new Ionic 4 Application with Sidebar template to test Google Analytics in with different pages.
Make sure you have the latest version of Ionic CLI installed
$ npm install -g ionic@latestCreate a new application
$ ionic start Ionic4GoogleAnalytics sidemenu
$ cd Ionic4GoogleAnalytics
As we have Ionic 4 application with Sidebar template already having two pages, home and list.
Install the Cordova and Ionic Native plugins
$ ionic cordova plugin add cordova-plugin-google-analytics
$ npm install @ionic-native/google-analytics
Next, we need a Google Analytics Tracking ID for Mobile application. Click on the following link get information on getting an ID for mobile applications.
How to Get Google Analytics Tracking ID for Mobile Device Tracking
After getting Tracking ID we can proceed further on adding GA to Ionic.
Add this plugin to your app’s module
Now we will inject Google Analytics plugin in the app.module.ts file then add in imports array as shown below.
import { NgModule } from '@angular/core';
import { BrowserModule } from '@angular/platform-browser';
import { RouteReuseStrategy } from '@angular/router';

import { IonicModule, IonicRouteStrategy } from '@ionic/angular';
import { SplashScreen } from '@ionic-native/splash-screen/ngx';
import { StatusBar } from '@ionic-native/status-bar/ngx';

import { AppComponent } from './app.component';
import { AppRoutingModule } from './app-routing.module';

import { GoogleAnalytics } from '@ionic-native/google-analytics/ngx';

@NgModule({
  declarations: [AppComponent],
  entryComponents: [],
  imports: [
    BrowserModule,
    IonicModule.forRoot(),
    AppRoutingModule
  ],
  providers: [
    StatusBar,
    SplashScreen,
    GoogleAnalytics,
    { provide: RouteReuseStrategy, useClass: IonicRouteStrategy }
  ],
  bootstrap: [AppComponent]
})
export class AppModule {}
Implementation of Google Analytics Methods in Application
Next, we will add GA code in the application to track Views a user visited and we will also add an event which will be triggered by user tap.
In app.component.ts file add the following code to start tracking with the provided Tracking ID
import { Component } from '@angular/core';

import { Platform } from '@ionic/angular';
import { SplashScreen } from '@ionic-native/splash-screen/ngx';
import { StatusBar } from '@ionic-native/status-bar/ngx';
import { GoogleAnalytics } from '@ionic-native/google-analytics/ngx';

@Component({
  selector: 'app-root',
  templateUrl: 'app.component.html'
})
export class AppComponent {
  public appPages = [
    {
      title: 'Home',
      url: '/home',
      icon: 'home'
    },
    {
      title: 'List',
      url: '/list',
      icon: 'list'
    }
  ];

  constructor(
    private platform: Platform,
    private splashScreen: SplashScreen,
    private statusBar: StatusBar,
    private ga: GoogleAnalytics
  ) {
    this.initializeApp();
  }

  initializeApp() {
    this.platform.ready().then(() => {
      this.statusBar.styleDefault();
      this.splashScreen.hide();

      this.ga.startTrackerWithId('UA-XXXXXXXXX-X')
      .then(() => {}).catch(e => alert('Error starting GoogleAnalytics == '+ e));

    });
  }
}
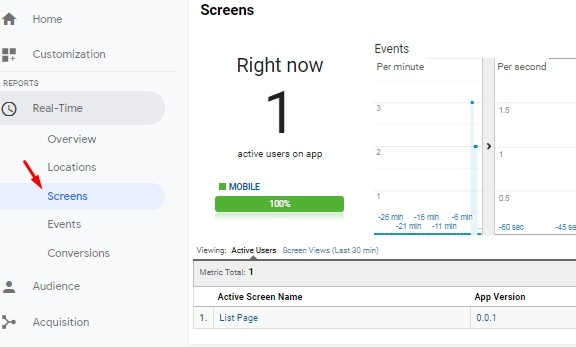
The method startTrackerWithId will start tracking in the application and you will start seeing your device in the Google Analytics dashboard.
Add trackView method in Home and List pages or any other pages you have in the following way. Here we have a list.ts file.
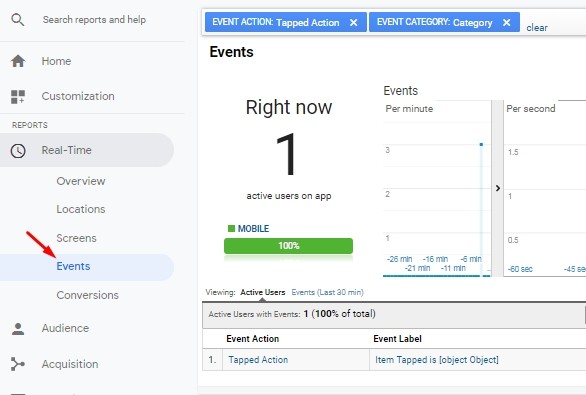
Using trackView method we can send the current page in Google Analytics dashboard. We have also added the trackEvent method to record a tap event.
...
...

  ngOnInit() {
    this.ga.trackView('List Page')
    .then(() => {})
    .catch(e => console.log(e));
  }
  // add back when alpha.4 is out
  trackEvent(item) {
    this.ga.trackEvent('Category', 'Tapped Action', 'Item Tapped is '+item, 0);
  }

...
...
you can check more event on documentation here
So now you can track live visitors in your application using the Google Analytics plugin in Ionic 4
This doesn’t seem to work for me. No errors just not showing up in the GA dashboard. The GA process is slightly different now so It could be related to that.