In this React 16+ tutorial, we are going to discuss how to implement Autocomplete or AutoSuggest control in a React Js application by using the react-autosuggest package.
An autocomplete control is used to enable a user to search matching options to the partial text entered. After entering some string, all the matching option values are fetched from local or a remote server to select from.
It is different from a drop-down where all values are immediately shown to the user for selection, but in case we have a large or huge list of databases from which we need to show options. In that case, a suggestion box is shown to present only matching values.
We’ll implement an awesome Autosuggest control with lots of features and customizations in the React application by using the react-autosuggest package.
Let’s get started!
Create a React Application
First, we’ll create a new React application using npx create-react-app command
$ npx create-react-app react-autosuggest-appMove inside the react app
$ cd react-autosuggest-appRun application
$ npm start
Install react-autosuggest Package
After creating the React application ready, install the react-autosuggest package by running below npm command
$ npm install react-autosuggest --save
Creat Auto Suggest Class Component in Application
Let’s create a new class component BasicAutoSuggest in the ‘~src/components/basic.autosuggest.js’ file, import the Autosuggest class.
By default, the package doesn’t provide any CSS style. Create ‘~src/components/autosuggest.css’ file to keep the style. Then paste this CSS code in it.
An AutoSuggest component is created by adding the <Autosuggest /> component. Let’s update the basic.autosuggest.js file with the following code:
// basic.autosuggest.js
import React from 'react';
import Autosuggest from 'react-autosuggest';
import './autosuggest.css';
class BasicAutoSuggest extends React.Component {
constructor() {
super();
//Define state for value and suggestion collection
this.state = {
value: '',
suggestions: []
};
}
// Collection of data
cars = [
{
name: 'Suzuki',
origin: 'Japan',
year: 1909
},
{
name: 'Fiat',
origin: 'Italy',
year: 1899
},
{
name: 'Honda',
origin: 'Japan',
year: 1948
},
{
name: 'Porch',
origin: 'Germany',
year: 1954
},
{
name: 'Audi',
origin: 'Germany',
year: 1910
}
];
// Filter logic
getSuggestions = value => {
const inputValue = value.trim().toLowerCase();
const inputLength = inputValue.length;
return inputLength === 0 ? [] : this.cars.filter(lang =>
lang.name.toLowerCase().slice(0, inputLength) === inputValue
);
};
// Trigger suggestions
getSuggestionValue = suggestion => suggestion.name;
// Render Each Option
renderSuggestion = suggestion => (
<div>
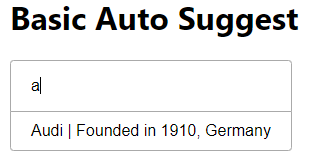
{suggestion.name} | Founded in {suggestion.year}, {suggestion.origin}
</div>
);
// OnChange event handler
onChange = (event, { newValue }) => {
this.setState({
value: newValue
});
};
// Suggestion rerender when user types
onSuggestionsFetchRequested = ({ value }) => {
this.setState({
suggestions: this.getSuggestions(value)
});
};
// Triggered on clear
onSuggestionsClearRequested = () => {
this.setState({
suggestions: []
});
};
render() {
const { value, suggestions } = this.state;
// Option props
const inputProps = {
placeholder: 'Type car name',
value,
onChange: this.onChange
};
// Adding AutoSuggest component
return (
<Autosuggest
suggestions={suggestions}
onSuggestionsFetchRequested={this.onSuggestionsFetchRequested}
onSuggestionsClearRequested={this.onSuggestionsClearRequested}
getSuggestionValue={this.getSuggestionValue}
renderSuggestion={this.renderSuggestion}
inputProps={inputProps}
/>
);
}
}
export default BasicAutoSuggest;There is a pretty much code, but it is very simple to understand for the most basic Auto-suggest control. Let’s have a look.
The BasicAutoSuggest is a class component and there we defined a state to update value and collection of data.
this.state = {
      value: '',
      suggestions: []
  };
We will use the setState method to update the value and suggestions array inside the onChange, onSuggestionsFetchRequested and onSuggestionsClearRequested event handlers
Each time a user types in some text to search, the custom filtration is done by calling thegetSuggestions method via onSuggestionsFetchRequested event handler.
   // Filter logic
    getSuggestions = value => {
        const inputValue = value.trim().toLowerCase();
        const inputLength = inputValue.length;

        return inputLength === 0 ? [] : this.cars.filter(lang =>
            lang.name.toLowerCase().slice(0, inputLength) === inputValue
        );
    };
Each option values is rendered by renderSuggetion, so that we can easily customize the layout.
The inputProps takes in the supported properties as an object.
Using BasicAutosuggest in App.js
As we are done with a reusable BasicAutosuggest component, we can use it in the App.js feature component as shown below:
// App.js
import React from 'react';
import './App.css';
import BasicAutoSuggest from './components/basic.autosuggest';

function App() {
  return (
    <div className="App">

      <h1>Basic Auto Suggest</h1>
      <BasicAutoSuggest />

    </div>
  );
}

export default App;
Now run the app by hitting $ npm start to see it working
React Autocomplete with Remote Server Results
Now we’ll discuss how to fetch server responses and show a customized option results. Create a new component ServerAutoSuggest at ‘~src/components/server.autosuggest.js‘
Update the server.sutosuggest.js file with the following content
// server.autosuggest.js
import React from 'react';
import Autosuggest from 'react-autosuggest';
import './autosuggest.css';

class ServerAutoSuggest extends React.Component {
    constructor() {
        super();

        //Define state for value and suggestion collection
        this.state = {
            value: '',
            suggestions: []
        };
    }

    // Filter logic
    getSuggestions = async (value) => {
        const inputValue = value.trim().toLowerCase();
        let response = await fetch("http://www.omdbapi.com/?s=" + inputValue + "&apikey=a591bb53");
        let data = await response.json()
        return data;
    };

    // Trigger suggestions
    getSuggestionValue = suggestion => suggestion.Title;

    // Render Each Option
    renderSuggestion = suggestion => (
        <span className="sugg-option">
            <span className="icon-wrap"><img src={suggestion.Poster} /></span>
            <span className="name">
                {suggestion.Title}
            </span>
        </span>
    );

    // OnChange event handler
    onChange = (event, { newValue }) => {
        this.setState({
            value: newValue
        });
    };

    // Suggestion rerender when user types
    onSuggestionsFetchRequested = ({ value }) => {
        this.getSuggestions(value)
            .then(data => {
                if (data.Error) {
                    this.setState({
                        suggestions: []
                    });
                } else {
                    this.setState({
                        suggestions: data.Search
                    });
                }
            })
    };

    // Triggered on clear
    onSuggestionsClearRequested = () => {
        this.setState({
            suggestions: []
        });
    };

    render() {
        const { value, suggestions } = this.state;

        // Option props
        const inputProps = {
            placeholder: 'Type movie name',
            value,
            onChange: this.onChange
        };

        // Adding AutoSuggest component
        return (
            <Autosuggest
                suggestions={suggestions}
                onSuggestionsFetchRequested={this.onSuggestionsFetchRequested}
                onSuggestionsClearRequested={this.onSuggestionsClearRequested}
                getSuggestionValue={this.getSuggestionValue}
                renderSuggestion={this.renderSuggestion}
                inputProps={inputProps}
            />
        );
    }
}

export default ServerAutoSuggest;
Here we are fetching the matching results from a third party API OMDB. This API returns the matching results with other movie details.
The getSuggestions method is doing a tough job here. It is using the Javascript fetch() method and returns a promise to the onSuggestionsFetchRequested method to update the state‘s suggestions value accordingly.
We are using the sync;await method to handle promise returned by fetch() method.
The renderSuggestion method is returning the custom template with an image.
Update the autosuggest.css file with the following properties
....
....

.react-autosuggest__suggestions-list {
  margin: 0;
  padding: 0;
  list-style-type: none;
  overflow: auto;
  max-height: 400px;
}

.sugg-option {
  display: flex;
}
.icon-wrap img {
  width: 50px;
  margin-right: 10px;
}
.sugg-option .name {
}
Using the Server Auto Suggest in App.js
Now use the ServerAutoSuggest component in the App.js as shown below:
// App.js
import React from 'react';
import './App.css';
import BasicAutoSuggest from './components/basic.autosuggest';
import ServerAutoSuggest from './components/server.autosuggest';

function App() {
  return (
    <div className="App">

      <h1>Basic Auto Suggest</h1>
      <BasicAutoSuggest />

      <h1>Server Auto Suggest</h1>
      <ServerAutoSuggest />

    </div>
  );
}

export default App;
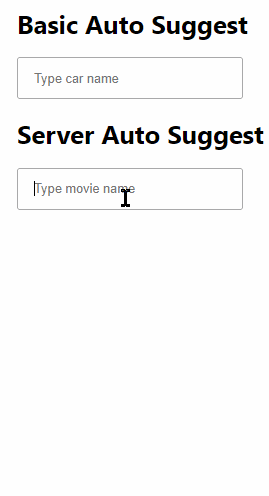
Now the final app will look like this
Source Code
Find the source code of this tutorial in my Github repository here.
Conclusion
Finally, we have implemented the Autosuggestion control in our React application, We also got to learn how to fetch dynamic responses from the server and use those results in the Auto Suggestion field. Using custom render we can easily customize the option template to show required data.
You can visit the official docs to check other useful features and properties.