In this Angular 9 tutorial, we’ll learn how to install ngx-datatable package and build datatables in Angular application with Pagination, Sorting, Filters with examples.
Data tables are widely used in applications to show data sets with necessary features which are must to have for good user interactions like Pagination, Sorting by columns, Scrollings in horizontal and verticle directions, etc.
Application dealing with a large number of tabular data, it becomes very difficult to manage other details as well like the columns with custom templating and flexible styling.
In this post, we will discuss a very popular Datatable module ngx-datatable which is fully loaded with many required features and also very easy to use and manage. We’ll also, discuss some issues faced during sorting and tricks related to resetting or navigation of pagination from class component using the offset property.

Let’s get started…
# Update Angular CLI
Run the following command to install the latest version of Angular CLI tool
$ npm i @angular/cli</pre> <h3># Create a new Angular project</h3> Now by using the Angular CLI, we'll create a new Angular 9 project by running the <code>ngcommand$ ng new angular-datatables</pre> Move to the project directory <pre class="wp-block-prismatic-blocks"><code class="language-javascript">$ cd angular-datatables</pre> <h3># Install Datatable Package</h3> To use Datatables in Angular project, we'll install the <code>ngx-datatablepackage by running following npm command in the terminal window$ npm install @swimlane/ngx-datatable</pre> <h3># Update App Module</h3> To use <code>ngx-datatablein the application, we need to import theNgxDatatableModulein application module to provide its methods to implement Datatable in components. Now open the app.module.ts file, and make following changes// app.module.ts import { BrowserModule } from '@angular/platform-browser'; import { NgModule } from '@angular/core'; import { AppComponent } from './app.component'; import { NgxDatatableModule } from '@swimlane/ngx-datatable'; @NgModule({ declarations: [ AppComponent ], imports: [ BrowserModule, NgxDatatableModule ], providers: [], bootstrap: [AppComponent] }) export class AppModule { }
# Import Theme Styles
The
ngx-datatablepackage comes with three awesome themes including Dark, Bootstrap and Material theme.There are two methods to import these themes in the Angular project:
Method 1) Import in the style.scss file
If you are using SCSS style of styling in Angular project then, you can simply import style files in the styles.scss file at the project root.
/* styles.scss */ /* You can add global styles to this file, and also import other style files */ @import '~@swimlane/ngx-datatable/index.css'; @import '~@swimlane/ngx-datatable/themes/material.scss'; @import '~@swimlane/ngx-datatable/themes/dark.scss'; @import '~@swimlane/ngx-datatable/themes/bootstrap.scss'; @import '~@swimlane/ngx-datatable/assets/icons.css';</pre> <h6>Method 2) Add in the angular.json file</h6> We can also add themes in the <strong>angular.json</strong> file's <code>stylesarray property as shown below.... .... "styles": [ "src/styles.scss", "./node_modules/@swimlane/ngx-datatable/index.css", "./node_modules/@swimlane/ngx-datatable/themes/material.scss", "./node_modules/@swimlane/ngx-datatable/themes/dark.scss", "./node_modules/@swimlane/ngx-datatable/themes/bootstrap.scss", "./node_modules/@swimlane/ngx-datatable/assets/icons.css" ], .... ....
# How to use a theme in
ngx-datatable?As you can see we have added all the themes at once, you can change the theme of a
ngx-datatableby adding a specific theme class on the<ngx-datatable>component:
class="material"
class="bootstrap"
class="dark"
Now we have configured our Angular project to use
NgxDatatablesin components.
# Adding NgxDatatable
To implement the NgxDatatable we add
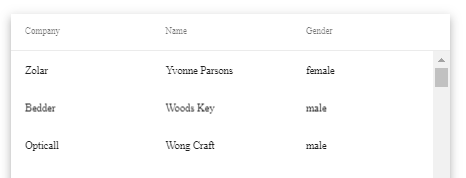
ngx-datatablecomponent with required and optional properties in the template file.Open app.component.html file then add following HTML code with data table template with dummy data
<ngx-datatable class="material" [rows]="rows" [columnMode]="'force'" [headerHeight]="50" [footerHeight]="50" [rowHeight]="50" [scrollbarV]="true" [sorts]="[{prop: 'name', dir: 'desc'}]"> <ngx-datatable-column name="Company"> <ng-template let-row="row" ngx-datatable-cell-template> {{row.company}} </ng-template> </ngx-datatable-column> <ngx-datatable-column name="Name"> <ng-template let-row="row" ngx-datatable-cell-template> {{row.name}} </ng-template> </ngx-datatable-column> <ngx-datatable-column name="Gender"> </ngx-datatable-column> </ngx-datatable></pre> <h6></h6> <h6>Option Properties Used</h6> <div> <div><strong><code>[rows]: Data object is passed in the [rows] property using which datatable is build.[columnMode]: This property id used to define the width of table columns using 'flex', 'fixed','force','standard'.[headerHeight]: Height of table header[footerHeight]: Height of table footer[rowHeight]: Each row's height in the table[scrollbarV]: Boolean to enable/disable verticle scroll[scrollbarH]: Boolean to enable/disable horizontal scrollIn the app.component.ts file, we will call dummy JSON data to build datatable[sorts]: Default sort column name in 'prop' and order by in the 'dir' with asc or descimport { Component, OnInit } from '@angular/core'; @Component({ selector: 'app-root', templateUrl: './app.component.html', styleUrls: ['./app.component.css'] }) export class AppComponent implements OnInit { title = 'angular-datatables'; rows = []; ngOnInit() { this.fetch((data) => { this.rows = data; }); } fetch(cb) { const req = new XMLHttpRequest(); req.open('GET', `http://swimlane.github.io/ngx-datatable/assets/data/company.json`); req.onload = () => { const data = JSON.parse(req.response); cb(data); }; req.send(); } } </pre> <a href="http://www.freakyjolly.com/wp-content/uploads/2019/04/Screenshot_5.jpg"><img class="aligncenter size-full wp-image-2310" src="http://www.freakyjolly.com/wp-content/uploads/2019/04/Screenshot_5.jpg" alt="" width="468" height="330" /></a> <h3># Issues with Implement Sorting with different column Header Name</h3> To make sorting work properly the property name in the dataset object should match the column name. So it sometimes stops working if there is a mismatch in <code>Column nameand data property. In this case, the Sorting on Company Name will not work... ... <ngx-datatable-column name="Company Name"> <ng-template let-row="row" ngx-datatable-cell-template> {{row.company}} </ng-template> </ngx-datatable-column> ... ...</pre> as name attribute is having "Company Name" which is different from the <code>companyin {{row.company}} So to resolve this we need to add prop attribute Sorting will work fine... ... <ngx-datatable-column name="Company Name" prop="company"> <ng-template let-row="row" ngx-datatable-cell-template> {{row.company}} </ng-template> </ngx-datatable-column> ... ...</pre> <em>Note: prop value is case sensitive so it should match exactly with a data property.</em> <h3></h3> <h3># How to Disable Sorting on a Single Column</h3> In some columns of a table like an index number or serial number we may not need the sorting faster. In that case, just add <code><strong>[sortable]="false"</strong>on<ngx-datatable-column>to disable sorting on a single column.# How to Change/ Reset pagination or go to a specific page in ngx-datatables?
During some operation, we may want to reset the pagination or come back to page 1. For that, we need to add a template reference variable on the <ngx-datatable>. As shown below we added the<strong>#myTable </strong>variable<ngx-datatable #myTable class="material" [rows]="rows" [columnMode]="'force'" [headerHeight]="50" [footerHeight]="50" [rowHeight]="50" [scrollbarV]="true" [sorts]="[{prop: 'name', dir: 'desc'}]"> ... ... </ngx-datatable></pre> Now, in the component class, we will get the reference of this data table using<code> #myTablein combination with@ViewChildof typeDatatableComponent. After that just set offset value to0which means page number 1.... ... import { DatatableComponent } from '@swimlane/ngx-datatable'; @Component({ selector: 'app-datatable', templateUrl: './datatable.component.html' }) export class DatatableComponent implements OnInit { @ViewChild('myTable') table: DatatableComponent; ngOnInit() { // for page number 1 as offset starts with 0 this.table.offset = 0; } ... ...</pre> by using offset you can change/ reset default pagination page number in the <code>ngx-datatable# Adding Filter Search on
To enable filter search we need to make some changes in the template and class Step 1) Add Input control withngx-datatable(keyup)="updateFilter($event)"key event handler<input type="text" placeholder="Type to filter the name column..." (keyup)="updateFilter($event)" /></pre> </div> <strong>Step 2)</strong> Add template reference variable <code>#myFilterTable(anything you want) on thengx-datatable. Step 3) Update class file withupdateFilter()method which we called onkeyupevent. Also, we need atempvariable to keep actual data loaded in the table before any filter action. Check highlighted changes for filter functionality in the class below:export class AppComponent { title = 'angular-ngx-datatable-tutorial'; temp = []; rows = []; @ViewChild(DatatableComponent) myFilterTable: DatatableComponent; ngOnInit() { this.fetch(data => { // cache our list this.temp = [...data]; // push our inital complete list this.rows = data; }); } fetch(cb) { const req = new XMLHttpRequest(); req.open('GET', `http://swimlane.github.io/ngx-datatable/assets/data/company.json`); req.onload = () => { const data = JSON.parse(req.response); cb(data); }; req.send(); } updateFilter(event) { const val = event.target.value.toLowerCase(); // filter our data const temp = this.temp.filter(function (d) { return d.name.toLowerCase().indexOf(val) !== -1 || !val; }); // update the rows this.rows = temp; // Whenever the filter changes, always go back to the first page this.myFilterTable.offset = 0; } }Here we are only filtering the Name column in the
updateFilter()method. To check the filter on all or selected columns see this tutorial.
Conclusion: So, in the above post, we implemented Datatables in Angular application using one of the most popular datatable packages
ngx-datatable. Thengx-datatablesupports a number of powerful features including freeze columns, table column filters, server-side pagination etc. You can build an awesome table using this package module.Category: Angular


very nice