Lazy loading is an architectural design which is popular these days among new technologies. This concept is mainly used in complex and data-intensive applications. In Lazy loading only that module or component is loaded which is required on that point of time, this makes an application very fast and economic on memory consumption factors.
Angular 6 allows to Lazy load modules when they are required, they are not loaded at once on application initialization. To implement Lazy loading in Angular 6 we will use the main Routing module which will import all components we want to lazy load.
In this application, each component will have its own module importing its own component and router using forChild
Let’s start implimentation.
1. Create a new Angular 6 application
Before creating Angular 6 you should already have NodeJS installed.
Install Angular CLI latest version using below command
$ npm install -g @angular/cliNow run below command to create e new project
$ ng new Angular6DemoFJ
$ cd Angular6DemoFJ
If you have Visual Studio Code(VS Code) installed in your system then the following command will open it with your project
$ code .
2. Create 3 views/pages to implement Lazy Loading Concept using
ng generate component view-one
ng generate component view-two
ng generate component view-three
Create respective module files in each component folder
view-one.module.ts
view-two.module.ts
view-three.module.ts
Create a respective router module file in each component folder
view-one-routing.module.ts
view-two-routing.module.ts
view-three-routing.module.ts
finally, our file structure will look like this
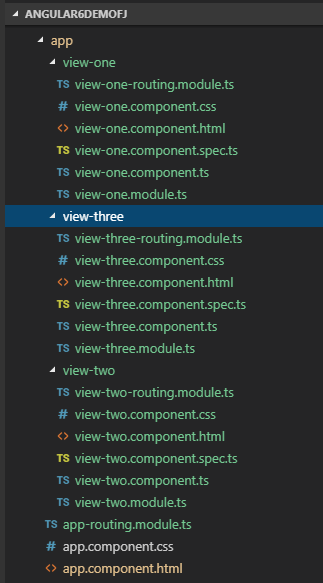
Note: we will create app-routing.module.ts in step 5
3. Import router module in app.module.ts
we need to import the Router Module in the main application module.
app.module.ts
import { BrowserModule } from '@angular/platform-browser';
import { NgModule } from '@angular/core';
import { AppComponent } from './app.component';
import { AppRoutingModule } from './app-routing.module';


@NgModule({
  declarations: [
    AppComponent
  ],
  imports: [
    BrowserModule,
    AppRoutingModule
  ],
  providers: [],
  bootstrap: [AppComponent]
})
export class AppModule { }
We can safly remove component imports and declarations from app.module.ts, as each view is already having thier own module defined.
4. Add code in Component Modules and their own routing modules
Add following code in view-one-routing.module.ts
import { NgModule } from "@angular/core";
import { RouterModule, Routes } from "@angular/router";
import { ViewOneComponent } from "./view-one.component";

const routes: Routes = [
    { path:"", component: ViewOneComponent }
];

@NgModule({
    exports: [RouterModule],
    imports:[RouterModule.forChild(routes)]
})

export class ViewOneRoutingModule{}
As you can see here instead of forRoot we called forChild as these are child modules which will be called in app’s main routing module in step 5.
Repeat same in the other two files view-two-routing.module.ts and view-three-routing.module.ts, don’t forget to change names of components 😉
In view-one.module.ts add following code
import { NgModule } from "@angular/core";
import { ViewOneRoutingModule } from "./view-one-routing.module";
import { ViewOneComponent } from "./view-one.component";

@NgModule({
    declarations:[ViewOneComponent],
    imports:[ViewOneRoutingModule],
    providers: []

})
export class ViewOneModule{

}
Repeat same in the other two files view-two.module.ts and view-three.module.ts
5. Define Routes using loadChildred attribute in app’s main routing module
Now in main app-routing.module.ts add below code.
import { NgModule } from '@angular/core';
import { Routes, RouterModule } from '@angular/router';

const routes: Routes = [
    {
      path:"view-one",
      loadChildren:'../app/view-one/view-one.module#ViewOneModule'
    },
    {
      path:"view-two",
      loadChildren:'../app/view-two/view-two.module#ViewTwoModule'
    },
    {
      path:"view-three",
      loadChildren:'../app/view-three/view-three.module#ViewThreeModule'
    },
];


@NgModule({
  imports: [RouterModule.forRoot(routes)],
  exports: [RouterModule],
  providers:[]
})
export class AppRoutingModule { }
Here we will define child modules in loadChildren attribute having a Hash # defining each independent module’s name.
6. Add links to Route/ Open views
app.component.html
<!--The content below is only a placeholder and can be replaced.-->
<div style="text-align:center">
<h5>
{{ title }}!
</h5>
<a [routerLink]="['/view-one']" routerLinkActive="router-link-active" >View One</a> |
<a [routerLink]="['/view-two']" routerLinkActive="router-link-active" >View Two</a> |
<a [routerLink]="['/view-three']" routerLinkActive="router-link-active" >View Three</a>
</div>
<router-outlet></router-outlet>
Now run application using
$ ng serve --openin the debugger, components are loaded after we click on the View link, they are not loaded on application initialization or app start.
Lazy loading may prove helpful when the application grows and have a number of components, this design makes application loading fast.
What if we have multiple components under one feature module? Do I need to create module and routing files for each component in feature module?